Like My Page On Facebook

Search This Blog

Saturday, December 29, 2012

Blue Cheese, Apples, and Maple Bacon

I thought I'd give you two blog posts today since I haven't written anything in about a week. The holidays really take up a lot of your time! Jeez! Now that I'm home again, and I have time to myself to actually kick back, I naturally want to cook something. When I want to relax with some good food, I'm all for simple, yet delicious, bites. I'm happy with small plates at restaurants because then I'm able to try multiple plates of food. Tell me how that's bad? :-) I almost thought about having a wedding full of appetizers instead of a full sit down dinner. Don't we always enjoy the cocktail hour more than the actual meal? Well, I do. There's a great bistro in Ellenville, NY called Aroma Thyme Bistro, and it's worth checking out! The inspiration for this appetizer comes directly from their new menu. They offer a wide variety of local and vegan entrees and there's something for everyone. If you're far from New York, and some of you are, here's a way to recreate this bite just as I did.

What you will need:
- a small block of good Blue Cheese (I used Roquefort)
- 2 slices of bacon, cut into lardons (small pieces or chunks)
- 1 Red Delicious apple, diced
- pure maple syrup
- 1/2 tsp Allspice

Preheat a small pan to medium and cook your bacon pieces until they're nice and crispy. Take the bacon bits out of your pan and let them drain on some paper towels. To your pan, add the diced apples and be sure to coat them in the oil from the bacon. Add a small drizzle of maple syrup over the apples just enough to make them glisten. The syrup is very sweet, so it goes a long way. Once they're cooking nicely, add your Allspice to the pan and mix. The goal here is to get the apples to soften so they have a tender bite. Cook them about 5 minutes.

When the apples are soft, remove them from the pan and add the bacon back to the pan. Coat the bacon with a little more maple syrup and cook for about a minute. This is a very quick process because your bacon is already cooked, and you just want to coat it with maple syrup for flavor.

Chop your blue cheese into chunks or blocks. Make sure you don't get small blue cheese crumbles. It wouldn't be a problem if you got blue cheese crumbles. You could just eat the mistake and then go get more cheese. The right kind. :-) Drizzle the bacon with syrup across the plate first. Layer the apples on top of the bacon syrup. Lastly, place chunks of blue cheese strategically all over the plate. Enjoy with wild abandon! I promise you'll love this. :-)

Poached Eggs with Spinach Hash and Walnuts

Breakfast for you tomorrow? I think so!!
Welcome to the one shining moment in my life when I will tell you...I think I found something I'd eat again for breakfast. Yes, you heard me. It's something other than a bagel and cream cheese that will get me eating breakfast more often. I've said before that I really don't love breakfast unless it's in the form of a soft, chewy bagel loaded with cream cheese. MMMMmmmm. Give me a hot cup of coffee and I'll be your best friend in no time. Thanks to a back issue of Cooking Light magazine, I made my husband extremely happy this morning. Not only is this dish filling and full of flavor, but it's HEALTHY too. You can start feeling good about serving this entree in 3...2...1.

What you will need:
- 10oz box of spinach, thawed and squeezed
- 1 cup of baby bella mushrooms, chopped
- 1 large shallot, sliced
- 3 slices of bacon, cut into small pieces
- 2 cloves of garlic, finely chopped
- 1/2 tsp dried thyme
- 1 tsp dried sage
- 1 Tbsp garlic powder
- 1/2 cup walnuts
- 1/2 cup Fontina cheese, grated
- 1 Tbsp of vegetable oil (reserve this
- a splash of red wine vinegar (optional if you don't have any)
- a small pot of simmering water
- 1 egg per person
- White vinegar for poaching
- Truffle oil (completely optional)

Begin by preheating your skillet and adding the chopped bacon pieces. Cook the bacon until it releases most of its fat and becomes crispy. Remove from the pan using a slotted spoon, and transfer to a plate lined with paper towel. Don't throw out your bacon fat because you will continue to cook your veggies in the same juices. At this time, you can also get a small pot of water simmering on the stove for your poached eggs. Once the bacon is on the paper towel, add the shallots and garlic to your pan. Sautee for about two minutes and then add your sage and thyme. Cook the spices into the shallots and onion for about 1-2 minutes. Add your chopped mushrooms. The reason I use baby bella mushrooms (which is just another name for portabella mushrooms) is because they are hearty and add body to the dish. Almost like meat without, you guessed it, the meat! :-) If at this point you feel like you don't have enough liquid for your veggies, you can add the reserved tablespoon of vegetable oil.

Moving right along here, you're going to sautee your mushrooms with the garlic, shallots, and spices. Cook till the mushrooms are starting to soften, but don't let them get too mushy. Add in your spinach (which you squeezed all the water out of, right?), add some garlic powder, and add the red wine vinegar. I only used a splash of the vinegar because it's a strong flavor and I didn't want my mixture to taste acidic. If you want more, you can add it. Once the vinegar is incorporated and absorbed into the spinach, add your grated cheese. The heat from your veggies will melt the Fontina. I may or may not have added more cheese. I'm not saying how much! ;-) Siiiiiiiigh. There's nothing better. Cheeeeeeeese. :-) Add the walnuts to your spinach mixture and allow the nuts to toast up for just a few minutes. Don't let them burn.

Let's get started on the eggs. I'm not one for poaching eggs all the time, so if you have a better way you like to poach eggs, by all means. This is the simplest way for me to poach an egg. Take a slotted spoon to the pot of simmering water and start stirring in a circle. Essentially what you're doing is creating what looks like a whirlpool. Crack your egg into the swirling water and allow the egg to cook for about 3 minutes. You still want the yolk to be runny and delicious, so don't leave it in there forever. You can repeat this process with the rest of your eggs. Remove the eggs from the water with a slotted spoon and lay them on a plate right over the spinach hash. If you're feeling fancy, drizzle a tiny bit of Truffle oil over the top.


Thursday, December 20, 2012

Mashed Potatoes with Kale


With the holidays coming up, I seem to always turn to foods which are comforting. Who am I kidding?! I love comfort food any day of the year, I love creamy food, I love dishes with cheese, butter, and anything decadent. It's not just because the holidays are coming up; this is me. I almost had you fooled for a second, didn't I? ;-)

But seriously, I love Christmastime because I think you can do some really great things with your holiday menu. It's the time of year when people like to indulge in great foods and desserts. Why not? When I saw a recipe for mashed potatoes with kale, I couldn't stop thinking about them. Not only will they be perfect with dinner on Christmas, but what's the harm in trying out the recipe BEFORE Christmas? And by before Christmas, what I really mean is last night for dinner. I planned my whole dinner menu around these potatoes. Yes, I was thinking about them THAT much! (I actually sent a few text messages to my friends yesterday telling them about this potato recipe. No, I'm not kidding. You know who you are!!) :-D

I slightly altered this recipe from one by Giada DeLaurentiis. Whether or not you really love kale, or kinda like it, this side dish will have you texting YOUR friends in the middle of the day!

What you will need:
- a few large Russet or baking potatoes, peeled and diced
- 2 cloves of garlic, crushed and peeled, plus 1 extra clove minced for the kale
- 1 package of frozen kale, thawed
- 1 small onion, minced
- 3/4 cup fat free chicken broth, divided (organic, if you can find it)
- 4 Tbsp butter, room temperature (and more if you're feeling saucy that day) ;-)
- 4oz. (half a stick) of Philadelphia cream cheese, room temperature
- 1/4 cup Parmesan cheese, grated
- olive oil
- salt & pepper

Chop your potatoes into roughly 1 inch cubes. No need to be precise because you're mashing them up anyway. Put all of your potatoes in a pot with enough cold water to cover them. It's very important to cook potatoes in cold water because if you wait for it to boil and then add the potatoes, the outside cooks faster than the inside. That's not going to get you creamy mashed potatoes. To the water, add some salt and your crushed garlic cloves. The garlic goes right into the water and you will discard them later. Allow the spuds to boil for 20 minutes. You'll have no problem mashing after that.

While your potatoes boil, prepare your kale. In a small pan, add your minced onion, a swirl of olive oil and some salt and pepper. Sautee for a few minutes until they're translucent. Add your one minced garlic clove and cook for about 30 seconds. To the pan, add your kale and sautee until the kale is covered with the onions and olive oil and heated all the way through. Add about a half cup of chicken broth to the kale and continue cooking. The kale will start to absorb the flavors of the broth. You're really trying to flavor the veggie as much as possible at this point. I used frozen kale because it is what I had in my freezer. I cook all the time with fresh kale, and it's delicious, but will take you a few minutes longer to cook it down. If you're in a hurry, go frozen. Same nutrients, freshness, and everything else that comes from the fresh version.

Drain your potatoes in a collander, and throw out your garlic pieces. Transfer your potatoes to a bowl and mash with a potato masher. Here's when you can throw everything together and mix, mix, mix! Add the cream cheese, butter, 1/4 cup of broth, Parmesan cheese, kale mixture, and salt and pepper. Mix everything together, and make sure to work the softened cream cheese into those potatoes. It should completely melt into the warm and creamy dish. I always taste my food for seasoning at this point. You can add more or less salt and pepper. (Or add more cheese. Or cream cheese. Who's watching??) ;-) Serve these while they're hot and delicious.

Note: They're even better the next day!! The garlic and onion really sets into the potatoes and they are really, really flavorful. If they seem too thick for you, when you reheat you can add a dash more of broth and some more cheese if you need to. I thought it was fine with a little more broth and some salt. Perfect! Perfect! Perfect!

Tuesday, December 18, 2012

Spinach, Feta, and Red Pepper Quiche

Easy weeknight meals. We're all looking for them. I love to cook, so there are times when I think I want an easy meal, but I really want to chop things up and get creative in the kitchen. The crock pot is a good option, but I don't always plan ahead enough to get everything I need into the crock pot in a timely manner. I usually think of ideas for dinner while I'm at work. Anyone with me on this? This quiche allows me to fulfill my destiny of wanting to chop things, and then I also get a delicious, healthy meal I can just pop in the oven. So go figure out something fun to do for 55 minutes while your dinner cooks. :-)

What you will need:
- 1 deep dish 9 inch pie crust, thawed
- 4 large eggs
- 8oz of plain Greek yogurt, 0% fat if you can find it
- 1 small onion, diced
- 1 medium sized red pepper, diced
- 1 package of frozen spinach, thawed and drained
- 1 1/2 Tbsp minced garlic
- 1 Tbsp of dried basil
- a container of reduced fat Feta cheese
- a drizzle of olive oil
- salt and pepper

Preheat your oven to 350 degrees. Have your pie crust on the counter to thaw if you haven't done so already. (Don't panic if you forgot. You'll have a perfectly thawed pie crust in 15-20 minutes. No big deal!) Heat a small pan on medium and add your onions and olive oil to the pan. Sautee for about 4-5 minutes until they are soft. Add the red pepper and sautee for another minute or so. All the veggies will cook down in the oven, so you don't have to soften them too much.
 Add the spinach and garlic to the pan. Cook a few minutes more until fragrant. Remove the pan from the stove and allow the mixture to cool for a few minutes.


While your spinach mixture is cooling, put together your egg mix. Into a medium bowl, add the eggs, Greek yogurt, and basil. Using a whisk, mix everything together.
 Add salt and pepper to taste. If your mixture is cool enough, add the spinach and pepper mixture directly to the bowl and stir.
Here's a little trick I like to incorporate into this dish before I put it all together. Sprinkle some feta cheese right on the bottom of the crust. You'll have a creamy, cheese-y layer between your dough and your eggs. It's really tasty! And again, you can never go wrong with more cheese! Haven't you learned that about me yet?? More cheese!!! I like my blend of veggies and Greek yogurt to be thick. When I add everything together it's almost the thinner consistency of a spinach dip. If that's not something you like, you can add a dash of milk or cream to your recipe.
Moving right along. Sprinkle your cheese down and then pour your mishmash of vegetables over the top. If need be, spread the batter to the edges with a spoon.
MMMMmmmmmm...looks good already, doesn't it? Don't eat it yet! You still have to bake it! ;-) Into a preheated 350 degree oven, and you'll have healthy dinner in 55-60 minutes when it's golden brown.

What variations will you use in your quiche? These just happen to be some of my favorites. Post your thoughts and comments below, and as always, enjoy!!

Friday, December 7, 2012

Bacon and Leek Risotto with an Egg

Mpfm pfmmrp drfp! Oh, I'm sorry. I really shouldn't talk with my mouth full, but this risotto is beyond amazing! I can't stop eating it! haha. I love, love, love risotto in all its forms and with any ingredients available to me. My favorite is mushroom risotto made with unique wild mushrooms and drizzled with truffle oil. I have made that entree more times than I can count, and while it is an indulgence, I always try and look for other variations. 


To date, this is one of the tastiest, most flavorful dishes I have ever made. I don't always love what I make, let's be honest. It can taste great, but it doesn't WOW me. Sometimes to me it is just cooking to get dinner on the table. I can tell you I will remember this meal for months to come.

I work just so I can buy wonderful ingredients to cook with. I always try and plan my meals each week so I can go to the grocery store just once. ONCE. That usually never happens. This delightful meal had me running to Adam's at almost 6pm last night for the freshest ingredients. I can't say I really minded. ;-)

This recipe is from a back issue of Bon Appetit Magazine. I followed the recipe as it was written except for the part about the egg. I'm really not a lover of eggs, so I had to make the egg the way I wanted it if this meal was going to work for me. The recipe called for poached eggs on top, so if you decide to make this, that is the egg that is really supposed to go on top. :-) The recipe serves 6 people, so you will have a lot of leftovers depending on who you're cooking for. 

What you will need:
- 6 large eggs
- 5 cups low sodium, low salt chicken broth (I use College Inn)
- 1 Tbsp olive oil
- 6 slices of bacon, diced or cut into small pieces
- 2 cups leeks, sliced thin (about 2 large)
- 1 1/2 cups risotto rice
- 3/4 cup dry white wine
- 3 Tbsp chopped Italian parsley
- 1 Tbsp butter
- 2 Tbsp grated Parmesan cheese
- Additional chopped parsley and Parmesan for garnish

My heart is pounding as I write up this recipe...it is so GOOD!! haha. Start by pouring your chicken broth into a small pan and bringing it to just below a boil. Turn the broth to a simmer and put a lid on it. When you cook risotto you need to make sure your broth is nice and hot before you add it to the risotto. This is an important step and a good one. 

Next, add the olive oil to your pan and add the bacon. Let the bacon cook down and become all crispy, crunchy and just amazing. Take a nice deep inhale as you're cooking because this is, indeed, one of the best smells EVER. ;-) BACON!! Your house will smell really fragrant for the rest of the night. It's a win/win.

Once the bacon is crisp, remove it from the pan with a slotted spoon, and let it drain on a plate lined with paper towels. Don't drain the bacon fat from the pan! I know, I know, it's not exactly part of your healthy diet, but you can make an exception just this ONE time. Moving along, add your sliced leeks to the pan and sautee. Do this for a few minutes until they soften, and be sure not to burn them. While the leeks cook they will absorb all the flavors of the bacon. Yum, yum, yum. Take about 2 tablespoons of the leeks out of the pan and put them in a bowl to the side. 


Take the risotto rice and add it to your pan of deliciousness which contains your leeks sauteed in bacon drippings. At this point you're toasting the rice, and it really brings out the nutty flavor of the grains. Do this for about a minute. I know it sounds weird, but don't skip this step either. All these little things make a difference.

Add the white wine to the pan and let the grains absorb the liquid. The risotto really begins to cook at this point. Begin adding the broth a ladle at a time. With each ladle full of broth, the rice will start to absorb the liquid and you will see it begin to grow. It will take about 20 minutes for you to add all the broth and for it to absorb. Don't add the next scoop of broth until the rice soaks up the previous spoonful.

The key to a good risotto is to keep stirring. This isn't the kind of dish you can make and walk away from. You have to stand there and keep stirring otherwise it doesn't work. Just keep stirring. (That reminds me of the movie Finding Nemo. "Just keep swimming. Just keep swimming." haha Just keep stirring!) Once the broth is finished, you should see a nice creamy risotto. 

To the finished pot add the butter. Stir the butter briskly into the rice so the starches are really released. Add the bacon, cheese, and parsley until incorporated. 

Last, but certainly not least, is the egg. I'm sure this probably sounds really weird to you, and I'm sure you can't imagine everything coming together, but this really does make sense. As I said earlier, the recipe calls for a poached egg, but I'm really not partial to poached eggs. I cook an over-easy egg on the stove because the yolk will still be runny. That's the consistency you want for the egg. If you like poached eggs, and you know how to make one, by all means! The combination of the egg, and then the egg yolk opening over all the other delicious flavors in the bowl...it's seriously a stunning meal. 

Go to your kitchen right now and see if you have the ingredients to start making this dish. Sometimes it's worth it to go out and spend a few extra dollars on fresh and delicious ingredients. You'll have plenty of leftovers, and the best part is, you don't have to share if you don't want to. :-) Bon Appetit!


Sunday, December 2, 2012

Cavatappi with Butternut Squash, Blue Cheese, and Walnuts


Every year around this time, I become obsessed with butternut squash. Chopped, pureed, in a soup, in the oven...you name it, I want it. The best part is that it's always readily available. This year I have made an unbelievable discovery. Well, it's actually very believable, but let me say it allows me to eat so much more squash! Woohoo! Green Giant has a bag of squash which is already cut into little pieces. If you've never tried to cut your own squash, it's a gigantic pain. Some may say otherwise, but I think it's a lot of work and buying the bag is much easier. It's perfect! I get a huge bag at BJ's for $5.00. Can't beat that. 

I found this recipe in a magazine, and it immediately caught my eye because of all the delicious flavors, but it REALLY got me because it is only 300 calories. Yes, 300 calories. 307 to be exact, but I think my revamped version is lighter because I swapped out a few ingredients for lower calorie foods. My recipe last night was using the last of my squash, so I only used about 2 cups of squash for this whole dish. I chop the pieces a bit small so it really goes throughout the whole dish and so I can stretch what I have.

What you will need:
- Jelly roll pan or pie plate
- Olive oil
- 2 cups butternut squash, more or less, cubed
- 2 cups Cavatappi pasta
- 1 large shallot, minced
- 2 Tbsp garlic, minced
- 2 Tbsp brown sugar
- 3/4 cup 1% low-fat milk
- 2 tsp flour
- 2 large egg yolks
- 1/4 cup toasted walnuts
- 1/2 cup of blue cheese crumbles
- salt and pepper

Preheat your oven to 400 degrees. In the pie plate, toss your butternut squash, olive oil, brown sugar, and salt & pepper. I like tossing my squash in brown sugar because it caramelizes in the oven and really gives it a sweet, sticky taste. My favorite! Roast your squash in the oven for 20 minutes stirring halfway through. The squash will acquire a shiny coating and be slightly browned. That's when you know they're perfect. Remove them from the oven and set aside to cool.

In a small pan, add a tiny swirl of olive oil and cook the walnuts for about 2 minutes. They burn very easily, so once you start to smell them, they're done. It's that quick. Set those aside to cool as well.

Put a large pot of water on the stove to boil. Be sure to add salt to the water when it begins to bubble, and add your macaroni to the water. While it's cooking, begin your sauce. In a small sauce pot, cook the shallots and garlic until fragrant. Add a 1/4 cup of your milk. In a small bowl, mix together the remaining 1/2 cup of milk and egg yolks with some salt and pepper. Take a few teaspoons of the hot liquid and add it to the cold mixture. This is called tempering. Adding cold liquid quickly to something hot can scramble eggs, and we don't really want that. Once you have tempered the mixture, slowly add it to your sauce pot with the shallots and garlic. Stir to combine and then add your flour. Turn the heat up until it just begins to boil and begin whisking the mixture. Lower the heat and continue whisking while the mixture becomes thick; almost like a cheese sauce. And guess what? There's no cheese in this creamy sauce! It's such a cheat because it makes you feel as if you're being really bad with a decadent dish full of fat. It's so nice to know you're really not. It becomes so thick and velvety, and you can smell all the garlic and shallots. It's incredible how this becomes a sauce. Stir for a few more minutes until it's creamy and the eggs are good and cooked.

Drain the macaroni and add it right back to the pot. Add the squash to the pasta and add the sauce mixture right on top. Toss together to coat every last piece of pasta. You'll want to get them all covered, believe me! :-) Serve in individual bowls and garnish with a sprinkling of nuts and about a tablespoon of blue cheese. This is one creamy pasta dish you don't have to regret! :-)


Thursday, November 29, 2012

Stuffed Shells With Butternut Squash, Spinach, and Parmesan Cheese (Lots of Cheese)

Once again, I need to bow to the gods of Pinterest. I have been staring at a recipe for stuffed shells that incorporates a lot of my favorite flavors: Butternut squash, spinach, cheese. You do know about my obsession with all things cheese, right? What I'm not a fan of is ricotta cheese. I know. I'm Italian and I'm supposed to love all things Italian. I don't even know why I don't like it; I just don't. Seeing as it's a main ingredient in this dish, I knew I had to really flavor it in order to get past it. That's exactly what I did. The recipe originates from this website.  This is a great vegetarian meal to make when you don't feel like eating any meat. And truthfully, after Thanksgiving and Thanksgiving leftovers, I'm just about done with poultry for a bit.

To make this dish is pretty easy. You just need to make sure and complete the steps as they come, otherwise some things will be done before others. Who wants mushy pasta because you're still getting your filling together? Not me. I added more or less of the ingredients to my taste, and I used a lot of what I already had. This is a running theme throughout my cooking. Sometimes it's necessary to go out and get certain ingredients to really make something work, but the best part of cooking is, you can experiment. Don't ever be afraid to do that. Some of the best recipes and flavor combinations are created this way. So head to your pantry and refrigerator, and let's grab some items!

What you will need:
- 13x9 or 11x7 baking dish, greased
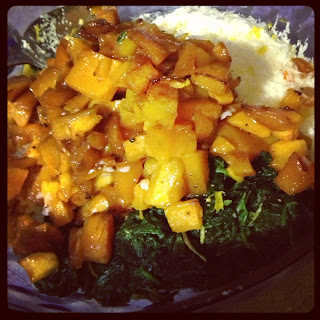
- about 2 cups Butternut squash, chopped
- 2 cup part-skim, low fat, ricotta cheese
- 1/2 cup of spinach, drained
- 1 Tbsp of lemon zest
- 1 egg
- 1 1/2 Tbsp brown sugar
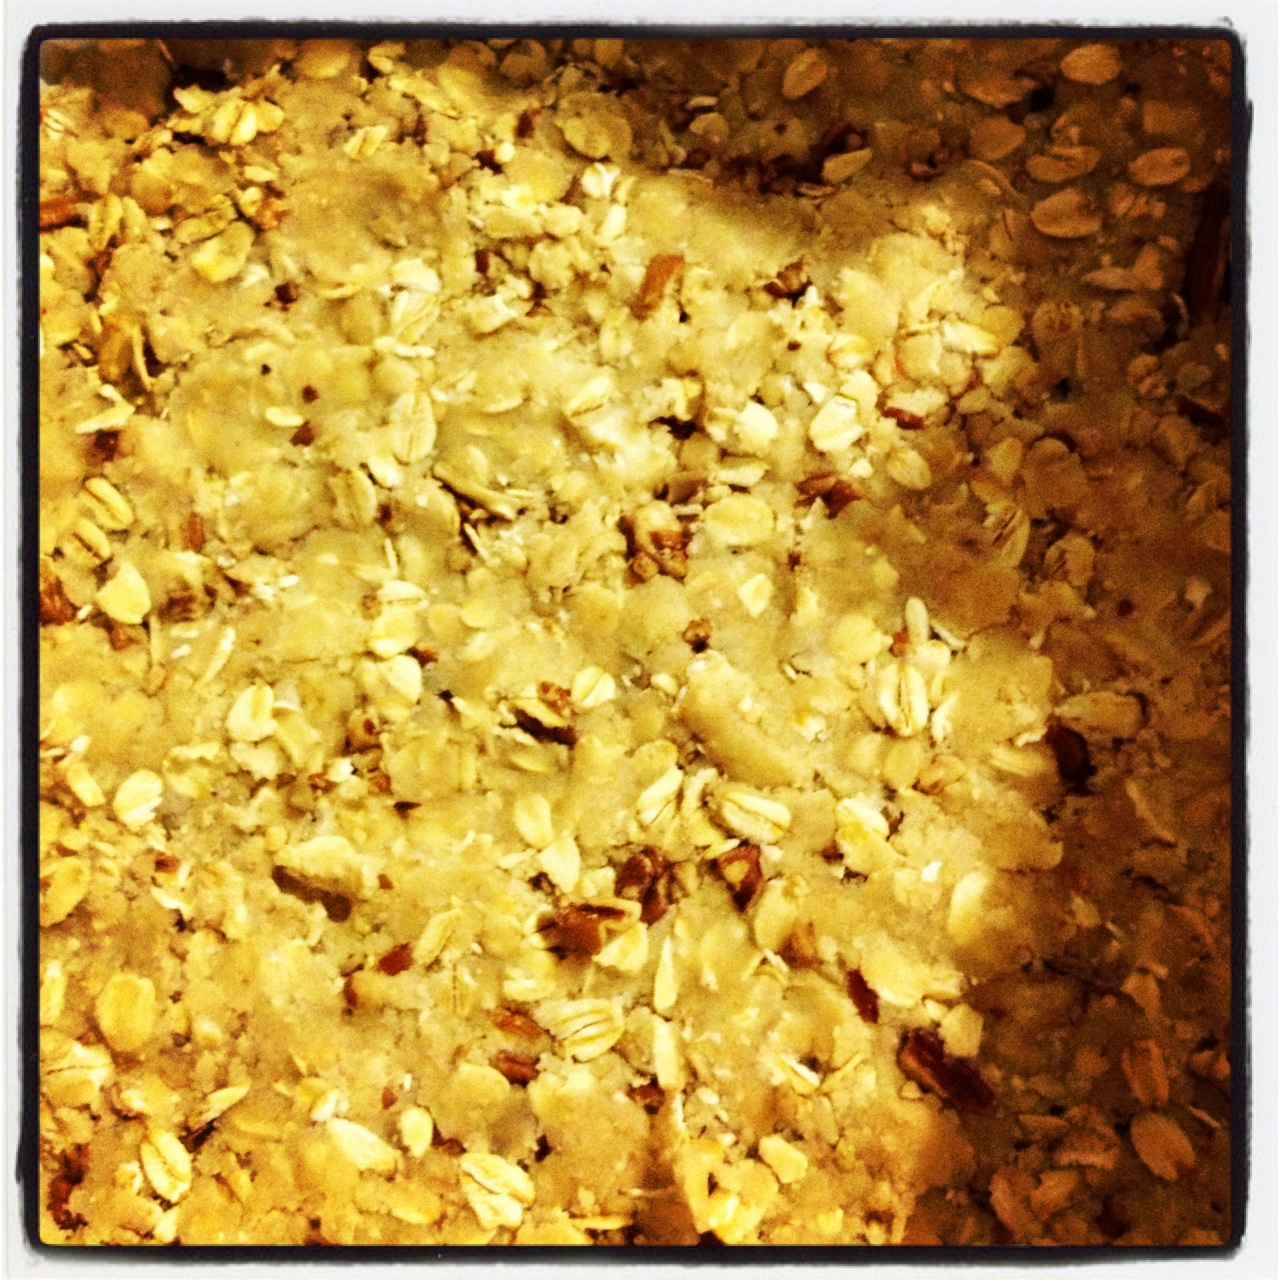
- 20 jumbo pasta shells
- Olive oil
- Parmesan cheese
- salt and pepper

For the sauce:
- 1 stick of butter (don't panic!) :-)
- 1 tsp dried sage
- 1 Tbsp lemon juice

Preheat your oven to 425 degrees. I like to chop my Butternut squash up a little smaller before I bake it. If you make the pieces smaller, and really bite size, they fit into the pasta shells a lot easier. On a baking sheet, mix your butternut squash with a splash of olive oil, salt and pepper, and the brown sugar. Mix together to be sure each inch of the squash is coated with your ingredients. Bake in the oven for 20 minutes.

While the squash is cooking you can boil your pasta and assemble the stuffing mixture. The recipe states you can make about a dozen shells with the filling. You are going to have so much filling, and I realized that as I started putting it together, so I threw more shells into the boiling water. 20 shells was the perfect amount, and I had used all my filling. As a side note, don't forget to salt your pasta water! This is the only chance the pasta will have to really absorb any flavors, so throw some salt in the water when it comes to a boil. This is the chance I also take to grate my Parmesan cheese. Yes, I grate my own cheese instead of buying it. I love Kraft cheese in the green can as much as anyone else, but I also like to know what I'm putting in my food along with my fresh ingredients. I just grab a big chunk of Parmesan from the cases near the deli counter and grate away. I grate my cheese right over the bowl, and if you know me, I'm pretty sure I didn't measure the cheese. Okay, I definitely didn't measure the cheese. :-D This is also why there is no measurement up above. Go for about a 1/2 cup and you can use more or less depending on your tastes. (Psst! Go for more!)

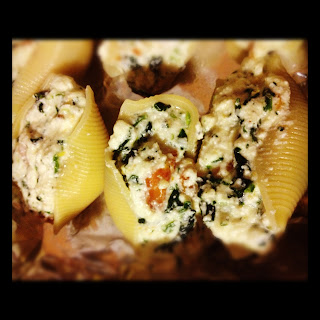
So into a bowl goes your ricotta cheese, grated Parmesan cheese, spinach, your egg, cooked Butternut squash, lemon zest, and some salt and pepper to taste. Mix everything together, and you'll start to realize how much the lemon zest really perfumes the entire mixture. It's the perfect accompaniment in this dish. It cuts through the rest of the ingredients which sound too heavy, and it gives it a fresh, clean taste. MMMMmmmmm...

After your mixture is prepared, check on your pasta to be sure it is al dente. No one likes mushy pasta, and in actuality, cooking your pasta to al dente is the way macaroni is supposed to be cooked. I took my shells out one by one and placed them on a platter to cool. It's best if you allow the shells to cool so they'll be easier to handle. Once cooled, take a jumbo shell and fill it with your Butternut squash - ricotta stuffing. This can get a little messy, and all of your shells will not stand upright. Don't get discouraged. Overstuffed, imperfect shells are what really make this dish rustic and extra special. Kind of like art; every plate will be different. Keep filling your shells and loading them into a greased baking dish. When I'm done, I like to grate a little more cheese over the top. It makes for the perfect baked dish!

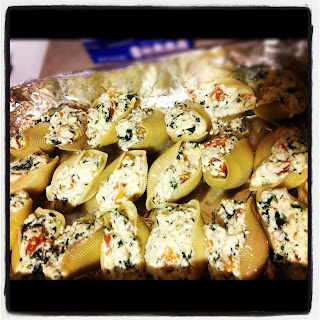
Pop your tray in the oven for about 20-25 minutes. I went closer to the 25 minute side because I love seeing the shells get slightly brown on the edges and for it to really look like a baked pasta dish. The end result is mouth watering, I promise you.

You just have one more step left. The sage, lemon, and butter sauce. Take a small saucepan and melt the entire stick of butter over medium-low heat. I know this seems like a lot of butter, but remember how many shells you have, and you're only going to drizzle the mixture over your plate. We're not dousing shells in butter. Keep that in mind. Once the butter is melted, add the dried sage. Stir frequently for about 2 minutes to make sure the sage blends into the butter. The last step is to add the lemon juice. Depending on how much you like lemon, you could add less if lemon isn't your thing. Stir to combine and get ready to serve.

This dish is so amazing, so I really hope you do try it. Like I said, experimenting with food, and putting more or less of the flavors and ingredients you like, is what cooking is all about. Cheers to a wonderful weekday, or weeknight, meal that's sure to satisfy and comfort. :-)

Wednesday, November 28, 2012

Chocolate Bread and Butter Pudding (Yes, you're reading this correctly)


I'll be honest, I'm not really a breakfast person. I can never settle on something to eat for breakfast that I really WANT. When I eat my food I want to really enjoy it, and the only thing I can really say I enjoy in the morning is a bagel with lots of cream cheese. I love cream cheese.

Yesterday morning I really wanted...something. My husband and I were enjoying Saturday morning together, and I wanted to cook. It was chilly and I wanted something warm and comforting. I remembered my sister had given me a cookbook for my birthday called The Newlywed Cookbook by Sarah Copeland. The recipes in this cookbook are decadent and not your run-of-the-mill dishes. This is precisely why I fell in love with this cookbook. What a fantastic gift. Anyhow, there is a recipe in the book which caught my eye from day 1. It is a chocolate bread pudding with butter, brown sugar, and the way I make it, lots of extra chocolate chips. :-) A girl's gotta have her chocolate! Here is the recipe how I used it and the ingredients I felt worked best. Enjoy!!

What you will need:
- 13x9 baking pan
- 1/2 cup of semi-sweet or milk chocolate, chopped
- 4 Tbsp butter, softened
- half a loaf of hearty, rustic bread, Ciabatta or anything similar
- 3 large eggs plus 3 egg yolks
- 1/2 cup brown sugar, plus 1 extra Tbsp
-1 cup Half & Half
- 2 1/2 cups 1% milk
- 1 to 1 1/2 Tbsp vanilla extract
- Cinnamon, plus more for dusting

Preheat your oven to 350 so it's nice and hot. Spray the bottom of your baking dish. Take about half of your chopped chocolate and sprinkle it on the bottom of your baking pan. You can use any kind of chocolate you have on hand. I actually had a wonderful chocolate bar in my fridge given to me by one of the chefs at The Culinary. It was dark chocolate with sea salt. Perfect combination and perfect for this dish! I chopped up what I needed of the chocolate bar, and I used regular small Nestle chocolate chips for a little extra decadence over the top. Let's be honest here, I definitely didn't measure any of my chocolate. haha. I chopped a nice little pile until I was satisfied that would do. You'll do the same! Trust me! Now I'm getting carried away just talking about chocolate, but you get my drift. Ok, so, after you stop obsessing about the delicious chocolate you have in front of you, take your half loaf of bread, slice it in half, and generously butter the pieces. **Note: Next time I make this dish - in the very near future - I will butter the bread but then I will cut the bread into small cubes. It's easier to eat, and I feel the bread sinks and absorbs the custard without really having to push the pieces down.** So you can go ahead and give that method a try. Spread the bread pieces out all along the length of the baking dish on top of your luscious chocolate. I told you this dish was to die for!

In a bowl, whisk together your eggs, egg yolks included, brown sugar, and cinnamon. Mix in the half & half and the milk. The reason I used both milk and half & half is because I was trying to convince myself I could lighten up the dish. I would like to think it worked. You could always use milk and nothing else and that would work too. Pour the custard mixture over the bread slices, and be sure to coat every piece of bread. Press the pieces down into the mixture to ensure they will soak up the yummy custard. Put the dish aside and let the bread and sugary sweetness work their magic and absorb all the fantastic flavors.

After twenty minutes, I added more chocolate. Just to the top, just to the top! It was only about a tablespoon of mini chocolate chips and nothing more. I really wanted to drive home the chocolate flavor. Scatter them around the top of the bread, and then dust the top with cinnamon. As the bread cooks, those extra chocolate chips will become soft and gooey, and they will melt into the crevices of the bread. Place your ridiculously decadent bread pudding into the oven for 55 minutes and wait with baited breathe. (Trust me, your home will smell so good! It's mind blowing!)

The bread pudding should sit for about 15 minutes or so. There's no real way to serve a bread pudding, so I just dug into it with a spoon and served it that way. There won't be any gorgeous, perfect slices, so don't think because it doesn't look "beautiful", you messed up. You didn't! Take a big bite and lose yourself in this breakfast treat. If you try this recipe, or any variations, let me know. Until then, happy eating!


Saturday, November 24, 2012

Hudson Valley Restaurant Week Reviews

As some of you may know, I was a guest blogger during Hudson Valley Restaurant Week this month. What an awesome experience and amazing opportunity! Using my background in writing, and my love for food, this was a dream come true. Can you imagine what it must be like to do this for a living? I can only dream, I guess. Anyhow, my 3 restaurant reviews have been published, and in case you didn't get to see them, I will post them here. I highly recommend each and every one of these restaurants. Their regular menu is just as tasty as the RW menu. Hopefully the reviews will do justice to the dishes. You may just have to taste them for yourself. I reviewed Eleven 11 Grille & Spirits in Fishkill NY, Cosimo's Brick Oven in Poughkeepsie NY, and Aroma Osteria in Wappingers Falls NY. Amazing, amazing dishes, and each plate was entirely different from the next. If you ever get the chance to participate in Restaurant Week, I suggest you do so. It's such a great opportunity to go out and try new places you may not regularly get to, and the price for a 3 course meal is very affordable. So without any hesitation, here are my 3 reviews. :-)

Eleven 11 Grille & Spirits

Cosimo's Brick Oven in Poughkeepsie

Aroma Osteria

Thanks for reading!! :-)

Thursday, November 22, 2012

Thanksgiving Leftovers Stromboli

I love Thanksgiving leftovers. Love them. It could be because I usually eat them in the comfort of my home on a nice, quiet Black Friday while everyone else is fighting chaotic crowds. You just mush all your favorites together in a sandwich and voila! But, as with everything, sometimes there are drawbacks. I really dislike messy sandwiches. If sauces or juices drip down my hands, if all the meat and deliciousness start falling out of the bread each time I take a bite...madness. I usually end up giving up on the delicacy after a few bites. Sigh. But it's so good!

However, this year I was determined NOT to have a messy sandwich. I had the luxury of having two Thanksgiving celebrations this year. Yes, two. So last week when I had leftovers and really wanted a sandwich, I had to think about how I would overcome the obstacle that is the messy sandwich. A pita just wouldn't cut it. I had it! Make it like a Stromboli! All your favorite Thanksgiving leftovers wrapped into a pizza dough and baked in the oven! You get the crispy and chewy texture from the dough, and you get to shove whatever leftovers you have into a fantastic roll. I was sold. The beauty of doing something like this is you can use whatever you have. It's YOUR creation, and it was YOUR Turkey Day dinner, so make it whatever you want it to be. I'll show you exactly how I put my Stromboli together. I also cooked some gravy on the side for dipping or pouring it right on top like we did. I made a fantastic cranberry mayonnaise, which we'll get to in a bit. Not that there's much to the cranberry mayo. I think this one is pretty self explanatory. haha (My favorite part) Like I said, none of this is hard, so just use your imagination. 

Start by spreading out your pizza dough on to a baking sheet that is lightly greased or sprayed. This happens to be whole wheat pizza crust. I found it in the grocery store in the refrigerated section near all the cheeses. You can use plain pizza dough, but this happened to be all they had. Obviously I'm no expert when it comes to spreading out dough, but just do the best you can. The more you stretch it out, the better. Just make sure it's not too thin because when you roll it will rip.
Next, cut your turkey and whatever else you're using into nice bite size pieces. They fit better once you roll the Stromboli, and it's a lot easier to eat. Besides, don't you think it looks prettier when all the pieces are nice and uniform? :-) I took the stuffing and crumbled it everywhere. No need to cut that up. I only had mashed sweet potatoes, green beans, cranberry sauce, stuffing, and turkey. Leave a border around the edges so the filling doesn't ooze out while baking.
Gently start rolling your Stromboli into a log. If you do get a tear in the dough, try and pinch it back together with your fingers.You can either leave the dough horizontally as it lies, or you can slowly move it around as I did. It doesn't matter either way. Score the top of the dough. This will allow some steam to escape as it bakes. Pinch the ends to be sure it is perfectly sealed. Bake at 400 degrees for about 40 minutes. It may seem like a long time, but remember, you need the dough rolled inside to cook as well. 
Your finished product should look like this. Sorry, for the giant shadow, but that's what you get with an iPhone. Working on that! Cut into as many slices as you'd like. Eat with a fork and a knife or your hands. Aren't our hands really our best tools? We eat with our hands so infrequently that sometimes it's nice to feel like a kid again. Kickball, anyone?  ;-)
If you have some leftover cranberry sauce, mash it up in a small bowl. Add a few teaspoons of mayo to the cranberries and stir. It makes a tasty cranberry flavored mayonnaise. I tend to add more cranberry than mayo because I like mine sweeter. Again, that's up to you. :-)

I hope you all had a wonderful Thanksgiving. We all have so much to be thankful for on a daily basis, and sometimes it's hard to think like this all the time. The holidays are what bring friends and family together. I'd like to think some good food does as well. I hope you try your own version with your holiday leftovers. Take a picture and let me know how it turns out. Happy Thanksgiving!!

Sunday, November 18, 2012

Corn Souffle

I slipped with my camera skills yesterday, and sadly I didn't photograph the deliciousness which was the corn souffle. I'm not really sure why I call it a "souffle" because it doesn't even have any eggs in it. It IS very light and fluffy, and it really puffs up like a souffle...so I'm just going along those lines. That's my story and I'm stickin' to it!
Last night we did Thanksgiving meal #1 at my parents' house, and this was one of the dishes I took with me. (You heard me right, I said Thanksgiving meal #1. I get 2 meals. I'm very lucky!!) Don't worry, when I make it again on Thursday I will come right back here and post a picture. Promise. :-) I don't know where this recipe originally came from. What I do know is someone made it several years ago and I have wanted it ever since. I never, ever remember to try and make it year after year. I don't know why. This may have happened because I was thinking a lot about corn the other day. If you read my previous post you can see the thought process has continued throughout my weekend. Getting off track again. So I'm going to give you the recipe that has worked for me, and let me tell you, it is very, VERY simple. Simple and crazy delicious. There were no leftovers last night, otherwise I would've taken them home. Get ready to wow your crowd.

What you will need:
- an 8x8 or 9x9 baking dish
- 1 box of Jiffy corn bread mix (the 8.5 oz size)
- 1 can of whole kernel corn, 15 1/4 oz, drained
- 1 can of cream style corn, 14 3/4 oz
- 1/2 cup butter, melted (It's 1 stick melted. Don't worry!!! It's Thanksgiving!!)
- 1 to 1 1/2 cups shredded cheddar cheese
- 1 cup sour cream (I use light sour cream)

Preheat your oven to 350 degrees and spray/grease your baking dish. Make sure you only use one of these smaller baking dishes. If you use a 13x9, or something larger, it throws off the whole recipe and you don't get the consistency you're looking for. In a medium bowl, mix together the corn bread mix, the cans of corn (don't forget to drain the whole kernel corn!), the butter, the cheddar cheese, and the sour cream. Mix until it is well incorporated. It will thicken slightly as you mix it. Yummy!
Pour into your greased pan, spread it out so the top is nice and even, and bake in the oven for 50-55 minutes until the top is golden brown. Allow it to cool off almost to room temperature. You don't want to dig into it right away because you want it to firm up just a bit. But if you can't wait and need to dive in, I totally understand. :-) Dish out with a spoon and enjoy! I am certain your family will like it as much as mine did.

And don't forget to come back towards the end of the week so I can show you a picture of just how wonderful this really looks!! :-)

Friday, November 16, 2012

Cheese-y Corn Pudding...Or Whatever You Want To Call It.


For some reason, yesterday I really wanted corn. Has that ever happened to you before? No? Hmmm...ok, well, it did to me. I had someone ask me for my favorite cornbread recipe last night (Yum!), so I'm thinking subconsciously that may have triggered it. Anyways, moving on. I knew I had a bag of frozen corn in the freezer. Don't wrinkle your nose. There's nothing wrong with frozen veggies. They're picked at the peak of freshness and they're so good to have in a pinch. (Be sure to check the ingredients and make sure there's no other junk in there. That's a different story.) So back to my frozen corn...what could I do with it? I wanted to do something decadent with the corn. Maybe some kind of souffle? That takes a while. I was looking for easy. Looking in may pantry, I had the most random ingredients: some bacon, some cheese...the wheels were turning. I am a secret lover of southern food. I guess it's not a secret anymore if I just told you. Come to think of it, this all could have been because I just watched an hour worth of Paula Deen on the Food Network. After much deliberation and brainstorming, this is what I came up with.

What you will need:
- 2 bags of frozen corn, any brand, 12oz each
- 2 slices of bacon, diced
- garlic, about 2 cloves, minced
- 1 tsp butter
- 2 Tbsp flour
- 1 cup milk, I used 1%
- 2oz cream cheese, room temperature
- 1 cup cheddar cheese, shredded
- Paprika
- loaf pan

Preheat your oven to 375 degrees. Lightly spray your loaf pan with non-stick spray. I'm quite sure this mixture won't stick to the pan, but hey, you never know. In a small pan on medium heat, start to brown the bacon pieces until they're nice and crispy. As the bacon crisps up it will release fat, so you don't need to add any oil to the pan. Once your bacon is the way you like it, add a teaspoon of butter (I know what I just said!) and your minced garlic. Flavors, flavors, flavors. Immediately take a nice, deep inhale because your kitchen will be smelling awesome! Mix all the ingredients around and cook for about a minute. To your mixture add your flour. Mix well and you will see the bacon and flour turn to a paste-like consistency. This is called a rue, and this is exactly what it should look like, so don't think you did something wrong.

Here's where I tested out a few things. You have a cup of milk, but add about half of it to start. Turn the heat up to a boil and keep stirring. The combination of the rue and the hot milk will form a cream sauce. If the cream sauce is way too thick, add more milk. You do want a creamy sauce, so think along the lines of a consistency like cheese sauce...and that is exactly what we will turn this into. Turn the heat off and add the cream cheese. Stir till it's fully incorporated, and then add the cheddar cheese. I know what you're thinking, and trust me, it sounds like a crazy combination of random things, but it's pretty tasty. Especially if you like cheese. :-)

Pour your corn in the loaf pan and add the cheese sauce. Mix it well and top with a small sprinkling of cheese. I hope I still have your attention. I said "cheese" about 9 times. Cook in the oven for 15-20 minutes until nice and bubbly. Allow to cool for 10 minutes and then serve on the side of your favorite dinner food.

Just remember, it's cheese-y, it's gooey, and it's only for those of you who are very adventurous. Keep an open mind with this dish, and you may be pleasantly surprised. Let me know what you think!


Monday, November 12, 2012

Creamy Pumpkin Pie Bars


Believe me when I say I am constantly thinking about food. Constantly. When I climb into bed at night, I usually end up surfing the internet on my iPhone until I fall asleep. You know what I mean, you've done it before. Like when you start reading a book and you're dozing off, and suddenly the book drops onto your chest or your face. Yep. That's what I'm talking about. I search Pinterest and food sites till my phone falls on my face. Searching for food or reading recipes doesn't keep me awake. It actually makes me really excited for whatever it is I'm making tomorrow. 

So, back to what I was originally talking about. These pumpkin pie bars are the perfect example. I have some lovely Twitter friends, and they know how much I love a good recipe. Surfing Twitter last night, I came across this lovely gem. It has all my favorite fall flavors. Pumpkin. Check. Cinnamon and nutmeg. Check. Pecans. Check. Butter. Ch...er...ok, so butter isn't a fall flavor, but it IS tasty! Just ask Paula Deen. I must have stared at this recipe for a good 10 minutes. I was forming my grocery list in my head, and I was forming a plan of action for the next day. These pumpkin pie bars would be in my possession by tomorrow. 

I can't take credit for this recipe. I really wish I could, but I just can't. The original recipe comes from Joy the Baker. If I could give her an enormous hug I would. These pumpkin bars are so perfect for this time of year. It seems a bit time consuming, but the end result is worth it. I don't say that too easily. There are few things in this life that I find VERY worth it. Well, that's not true. Marrying my husband was worth it. So that's TWO things: marrying the one I love, and making these pumpkin pie bars. Both are life changing! ;-) So go check out the recipe for these bars. The more I talk, the longer it will be before one gets to your pie hole. Pun intended. ;-)

I'm sending you right to the link for the pumpkin bars because like I said, I really didn't change much in this recipe. I just wanted to try it. I added more of the spices than was required by the recipe, but that's just me. I like LOTS of flavor in my dessert if I know how those flavors will meld together. Spicy and warm fall spices blend so well in this dish, so don't be afraid! :-) Look below at my photos to pique your interest. When will YOU be making this dessert??
What your "crumble" mixture should look like after you add in the cold butter.
Press half of your crumble mixture down into your pan lined with parchment paper.
All spiced up and nowhere to go. It's going somewhere!...in my oven!! 
Pumpkin mixture goes on top of the crust, and then you top the mixture with your crumble.
One more time for the cheap seats in the back!...the final product!! 


Thursday, November 8, 2012

Lydia's Banana Bread

I hope I'm not alone when I say that each time I go to the grocery store, I always try and grab some fresh looking fruits and vegetables. I know, I know, healthy eating. I got it! A staple I am always grabbing is a bunch of bananas. Depending on how busy our schedules are, we either eat them too fast or not fast enough. Letting them sit for too long results in THIS:
Don't throw these out!!!
This is the time when most of us throw out the spotted, overly ripe wonder fruit. DON'T DO IT!! What you see before you is the perfect opportunity to bake something insanely good. I always tell myself I will cook with the bananas and then I never do it, except for this time. I always get so disappointed with banana bread because it never has a strong banana flavor. That's the very reason we eat the bread, am I right? I don't like to use prepared mixes either because they are full of junk. I can't even pronounce most of the words. Thanks to a very generous friend of mine, Lydia, she offered up her mother's banana bread recipe. I have been such a procrastinator, and I didn't try this out till last night. Honestly, you will NOT be disappointed if you make this bread. I should've made it sooner. It's so simple. Can you get out all your ingredients, put them in a bowl, and then mix it up? You're a genius! Let's get started so you can as well.

What you will need:
- a loaf pan
- cooking spray
- 3/4 cup of sugar
- 3 Tbsp butter, softened
- 2 eggs
- 1/2 tsp of salt
- 1 1/2 cups of flour
- 1 tsp baking soda
- 1/2 tsp baking powder
- 1 tsp vanilla
- 3 bananas, mashed

Preheat your oven to 350 degrees. Generously spray your loaf pan so your bread doesn't stick. Cream the butter and the sugar together in a bowl. Take all your other ingredients, measure them carefully (this is so important in baking!), and add them to your bowl. Mix everything together, and just know that your batter will be a little lumpy. 
It should look something like this:
Looks good already!

Transfer everything to your greased loaf pan, and bake in the oven for 60-65 minutes. Everyone has a different oven, so be sure to keep an eye on your dessert.
I'm already getting excited!

 Mine was fully cooked around 60 minutes. Insert a toothpick or knife into the center, and if it comes out clean, you're good to go. Check out my results!
MMMMMmmmmmm...smells heavenly! 

Now that's a good looking banana bread! Allow it to cool in the pan for about 10 minutes, then invert it to a wire rack to continue cooling. I promise you will absolutely love this recipe. Let me know if you can wait till it's cooled off to slice a piece. I couldn't! Add a little butter and a good cup of coffee...you can thank me later! (Or Lydia!!) Hopefully you'll make this soon. It's the perfect fall treat. :-)

Saturday, November 3, 2012

Chocolate Chip Cookie Bars With Salted Caramel

Chocolate chip cookie bars and salted caramel. Have you ever heard of anything so amazing?! Just the thought of anything with salted caramel is enough to send me into a foodie lovers tailspin. Mmmmmmm.... How did the world not know about salted caramel long ago? How did we get by? These days, it seems everywhere you look  there is a salted caramel treat on the menu. I have no problem with that! :-)

I went to the grocery store yesterday in the midst of everything that has been going on with the Hurricane Sandy aftermath. I knew I would be staying in this weekend to save gas, and also, I just wanted to stay off the road so I didn't create more traffic. Maybe you can relate to this, but I love to stay in and have good food. If there's a snow storm coming, I immediately think about what tasty foods I will be making. A big sporting event (can you say Super Bowl??), that's my perfect opportunity to throw a party and cook up a frenzy of delicious munchies. So, you can see where my logic was going with this one. My sweet tooth had spoken. If you have a few minutes to be in the kitchen, and you want a treat that is sweet, gooey, chewy, and just comforting, these cookie bars will change your life. Let's get cookin'.

What you will need:
-a 30oz package of chocolate chip cookie dough ( I use Pillsbury.)
-a bag of caramel squares or bits
-sea salt
-cooking spray

Read your cookie package and preheat the oven as directed. For me, it was 350. Take an 8x8 cooking dish and coat with your cooking spray. Open your cookie package and cut the dough in half so you have 2 equal pieces. Take your first chunk of dough and spread it out on the bottom of the dish. It's probably easier if you break it up and then push it down to cover the dish. It should look something like this:
Once that is complete, sprinkle your caramel pieces on top. You can find round caramel circles in a bag at most stores, (I found mine at WalMart) or you can just use regular caramel pieces and cut them in half. Do NOT use the caramel sauce in a squeeze bottle that you use on ice cream sundaes! That stuff is designed to stay like a sauce or a liquid, and it doesn't firm up. Your dessert will remain gooey and too soupy. The caramel needs to be able to shape up a little bit after it has been cooked. I'm not saying you can't drizzle a little extra on your slice well after it's done... Just FYI. ;-)
Cut your caramel pieces in half so they melt better.
Sprinkle about 2 tbsp sea salt on top of the cookie dough caramel concoction. 2 tbsp may seem like a lot to you, so you can start small and then add more. It depends on how much you want the salt to come through. It will look something like this:
This is without the sea salt so far, but you get the picture. :-)
Take your last chunk of cookie dough and layer it on top of this mixture. Again, it's probably easiest if you break it up and then push it down. This will be your end result:
YUM!!! And it's not even cooked yet!
You will need to cook this a bit longer than regular cookies because we piled so much on. Smaller batches of cookies, when they're spread out, will cook faster. You should cook this about 30 minutes, or until golden brown. Just watch your stove because they are all different, and who would want to burn this?? When it comes out of the oven it will be VERY soft, and it will need a few hours to firm up. The consistency out of the oven is almost soupy, so don't be alarmed. The more the cookie firms up, and there's a chance for the caramel to set up, the better these will be. Trust me! Hopefully you can wait that long. I barely can. Here is the finished product:
Chocolate Chip Cookie Bars with Salted Caramel running all through it!  The ultimate sweet treat!
The end of the cookie will be a bit crunchy, the center is so chewy, and the caramel is gooey but holds its texture. I can't describe these in enough detail. You'll just have to try them for yourself. After a while you won't want to share them! And can you blame me?! :-)